This is a culmination of several passions of mine. I am an avid hiker and backpacker, an artist, and compulsive DIYer. Trained as an oil painter, a part of me has always been frustrated that oils were too heavy and messy to pack into the backcountry with me. Inspired by the peerless James Gurney’s sketch easel design, I set out to build an ultra portable, ultra lightweight setup. My goal? A minimum functional weight of under one pound.
Welcome to the One Pound Painting Project: an ultra portable, extremely lightweight, backpacking easel and gouache paint kit. It isn’t pretty, but it is incredibly inexpensive and functional.

Features
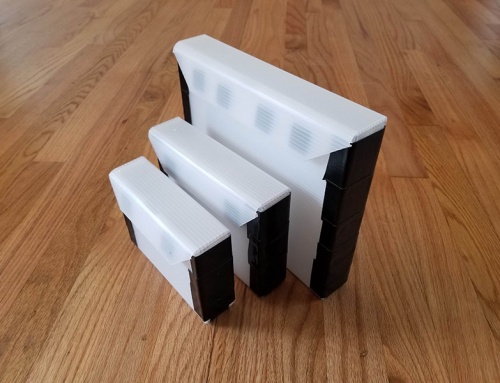
- Very light weight: just 178 grams (0.39 lbs) by itself or 450 grams (0.99 lbs) as a kit
- Very compact: 4x6x0.5” closed or 5x6x1.75” when packaged with the rest of the gear
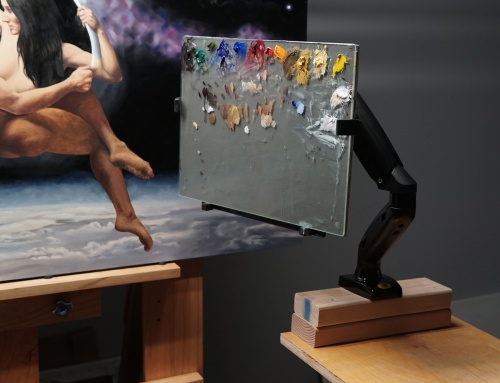
- Magnetic shelf so your palette (and/or water cup) stays secure
- Usable as a hand-easel or tripod-mountable
- Destroys excuses
Other Kit Parts
Materials List
- Aluminum Composite Panel (also known as Dibond or simply ACM) – roughly 7×8” minimum, 3mm or 1/8″ thick
- 8 Machine Screws (#6-32x 3/8″) and Matching Nuts
- 2 Friction or Torque Hinges – Normally used for repairing things like laptop hinges, this is a tricky one to reliably link. The manufacturers tend to make them in small batches and they go in and out of stock frequently. Good news is any similar pair
 should work! Linked are the ones I used.
 - Brad Hole Tee Nut, 1/4-20 x 1/4 – This is what I used but any option that has 1/4-20 threading (what you need for standard tripod mounts) and is roughly as deep as two ACM panels stacked together will work. For example, use 1/4-20 x 5/16 if your ACM is 4mm thick
- 10 Neodymium Button Magnets (5mm x 2mm)
- 2-3 Washers (I bet you have a few in your junk drawer)
- Two Part Epoxy
- Sandpaper (120 grit preferred)
Tools Used
- Drill
- 1/8″ drill bit
- 1/4″ drill bit
- 5/16” drill bit
- Razor + replacement blades
- Ruler
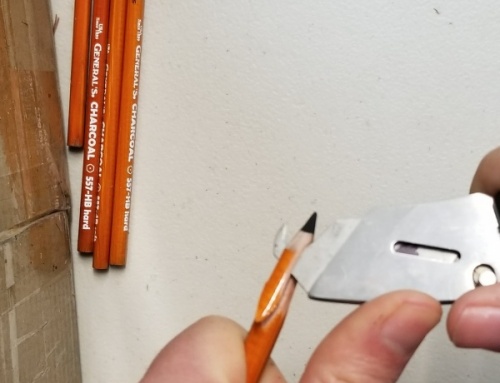
- Pencil
- Painter’s tape
- Assorted clamps
- Screwdriver
- Wrench or ratchet
- Vice grips or channel locks (recommended)
- Hammer (recommended)
- File (recommended)
- Center punch (recommended)
Blueprint

Click to see a larger version of the backpacking easel blueprints
Since artists tend to be visual people, let us start with a rough blueprint of what we’ll be doing with the ACM panel. Don’t worry! It looks complex but, in reality, you’ll be spending most of your time waiting for epoxy to dry; cutting everything to size and assembly can be done in about an hour.
Even though the blueprint has all the information you probably need to figure out how to put the backpacking sketch easel together, I would recommend reading through the entire set of instructions before getting started. Not only will the rest of the article detail the order and method to do everything, I will be going in depth as to why I chose certain design decisions and the mistakes I made along the way (and how to avoid them).
Laying It All Out
Start by using your ruler and pencil to mark the big cut lines, namely primary two panels (4×6”) and the strip that will serve as the shelf (3/4x 3 1/2”). After you have drawn those, mark 1/4″ from each corner on each side and then draw a diagonal line between them as shown below. A quality-of-life improvement from the v1 easel, this will round the corners enough that you won’t snag the easel on your bag without sacrificing too much in the way of usable space.
The shelf isn’t pictured below, but fit it in the extra space on the panel. If you don’t have a power tool to do the cutting in the next step, don’t fret! ACM is easily cut with a razor blade, but you will be cutting the sheet edge-to-edge so position everything accordingly (the blueprint shows one potential layout on an 8×10” sheet).
Before the next step, I would recommend drawing the guideline for positioning the shelf on the upper sheet as well and the magnet locations. It is just ever-so-slightly easier to do before you cut the corners off.
Tools & Materials Used
- Ruler
- Tape
- Pencil
- ACM panel
Cutting
If you have the power tools to do so, I am going to assume you know how to use them. Just remember that the blade will generally eat 1/8″ of material, so cut on the outside of your lines.
If you do not have a powered blade, cutting ACM with a razor blade is a fairly simple process. Amanda Teicher, a fantastic artist in her own right, also runs Amandaspanels.com and produced a youtube video that documents the process.
To start, lay your ruler along one of the major lines, tape it into position, and gently score the ACM with your razor. Repeat, adding a little more pressure until you have a decent groove and the blade won’t jump out of the line you’ve made. Continue scoring until you have cut through the first layer of aluminum and through the core into the bottom layer of aluminum. If you are a patient person, you can continue going, cutting through the bottom layer until it is completely separated. If you’re like me, once you have reached that second layer, place the cut line on the edge of a table, hold it down, and gently flex the other side, up and down. It will weaken and snap into two pieces.
Repeat for all the major cut lines until you have your two panels and shelf. Finish off this step by taping the ruler along the corner cuts and lopping them off. Since they’re so small, I found it more effective to just cut through all three layers than trying the “bend” method we used for the major lines.
You might find that there’s a slight bent lip where you cut the panels. Running it along a file will clean it up in a jiffy.
Tools & Materials Used
- ACM panel
- Ruler
- Tape
- Pencil
- Razorblade
- File (recommended)
Magnet Holes

These are an optional but a very useful addition. As you can probably tell, this lightweight backpacking easel is exceptionally small, which means anything resting on the bottom panel can be easily knocked off. I’ve found that most travel palettes (including the one I recommend in the materials list) are made of magnetic metals. By embedding magnets in the lower panel, we’ll give our palette the extra security it needs. You can also get crafty by epoxying small washers to to the bottom of a water jar or other accessories so they can stick to the panel as well. Neodymium magnets are rated by their power with N52 being the strongest, which is why I recommend the ones in the materials list. They might be tiny, but they are powerful!
For maximum attraction, I recommend using a 1/4″ bit to drill through the backside of the lower panel until it “kisses” the second layer of aluminum. If you have a center punch tool, it will help prevent the bit from walking, but if you don’t, grab a small sturdy bit you don’t mind abusing and give it a light tap with a hammer instead. It is important not to swing too hard or you’ll dent the other side of the panel like I did.
The sandwiched material in the ACM is very soft so you won’t need too much pressure to carve out the holes for the magnets. Let the drill peel away a little at a time, checking frequently until you can see the shine of the other layer of aluminum. If you accidentally cut into the second layer of aluminum it is okay as long as you do not drill completely through. As you can see, I accidentally did so with my first hole. It isn’t pretty, but it still functions fine! If you are a little rough with the panel, either while drilling or when using the punch, use a hammer to gently tap the face side flat again.
Tools & Materials Used
- ACM Panels
- Drill
- 1/4″ Bit
- Hammer (recommended)
- Center punch (recommended)
Shelf Assembly

The shelf serves a dual purpose. It is both a sketchbook rest and provides most of the “thickness” needed for the tripod mount. You might have noticed that the shelf is not as wide as it could be too, as it is only 3 1/2″ wide while the space between the hinges is actually closer to 4 3/4″ wide. My initial design actually was wider and I learned my mistake the first time I tried to close the prototype. The bolts attaching the lower panel to the hinges need that empty space and without it the travel easel will not close fully.
If your pencil marks rubbed off, the shelf is centered on the top panel, 1 1/4″ from each side. Make certain the position line, 3/4″ from the bottom edge, is also nice and clear.
Note: If you want to save some time, you can do the “Magnet Assembly” step alongside this one.
Now that you have the magnet holes finished and all your panels cut, we’re on to the first epoxy session. There is a whole host of epoxy options to choose from, but I personally prefer JB Weld’s original formulation. I have found that the separate tubes are much less messy and result in less waste over multiple uses. The syringe-style epoxy nozzles always seem to gum up on me long before I have finished the entire container.
Prepare the top panel and shelf by using sandpaper to roughen their surfaces where they will attach. You don’t need to sand down to the aluminum, just enough to dull the shine and give more “tooth” for adhesion.
Mix some epoxy and give the sanded side of the shelf a decent coat. Avoid smearing it too close to what will be the top edge. You’ll be surprised how much will squish out and the cleaner the edge is where the sketchbook rests, the happier you’ll be!
Place and clamp the shelf on the top panel, making certain to align the top edge with your earlier guidelines so that it will be a nice level surface to support your future great works of art. Give it a minute or two and then wipe off any excess epoxy that might have squeezed out.
Let the epoxy set for the recommended amount of time before going to the Tripod Mount step.
Tools & Materials Used
- ACM Panels
- Epoxy
- Sandpaper
- Clamps
Magnet Assembly

Take the lower panel and place it with the drilled side facing up. If you have a metal table or surface, I’d highly recommend doing this step on that. Once you start placing the magnets, it is nice to have them “snap” into the holes and stay where you want them.
Mix a batch of epoxy and use a utensil (like a toothpick) to dab a decent amount of epoxy in each hole. Place a single magnet in each hole. If you have them in a stack to start, you can more readily place them with their polarities all in the same direction. Practice first! They won’t want to be separated and if you’re not careful, they will pull each other out of their respective holes if you get too close to them.
Once the magnets are placed, add a little more epoxy to each hole until they are completely filled. The epoxy should naturally level itself before it sets up. Wipe off any stray epoxy that dribbled on the rest of panel and let it set up.
Tools & Materials Used
- ACM Panels
- N52 button magnets
- Epoxy
Tripod Mount

After the epoxy on the shelf has set up you can remove the clamps. Mark where you will be drilling the hole for the tripod mount, 3/16” from the bottom/top edges and 1 3/4″ from either side of the shelf. Lightly center-punch and drill a 5/16” hole. Gently sand around the hole and the tee nut to give the epoxy some tooth to grip.
If you purchased the tee nut I recommended, you’ll notice the obvious “T” shape (hence the name). When you install it, make certain the “hat” is on the shelf side so when you attach a tripod your sketch easel is sandwiched between the tripod and the hat. It’ll be more secure and protect against accidentally pulling the mount out of the easel by torquing the screw too much.
Mix up some epoxy, coat the outside of the nut column and bottom of its “hat” and insert into the hole you made earlier. Pay special attention that your clamps do not rest on the other side of the nut (where it sticks out of the back of the panel) and let it dry.
Tools & Materials Used
- ACM Panels
- Brad Hole Tee Nut
- Drill
- 5/16” Bit
- Epoxy
- Sandpaper
- Clamps
- Center punch (recommended)
- Hammer (recommended)
Tripod Mount Addendum

Remember earlier where I said the shelf provides most of the thickness needed for the mount? If you used 3mm panels and the tee nut I recommended, the nut should be sticking out of the back of your easel by a hair but if you used a 4mm panel, you might be able to skip this step.
In its current state, if you try and mount the easel to a tripod, you will notice that it isn’t very stable and most likely will spin on the tripod with ease. This is where the two random washers come into play. They will provide just enough additional material for the tripod attachment to be rock solid.
You have two options. The first is to epoxy 3 washers around the tripod mount but if you are counting ounces and really want a one pound painting kit, you can easily snap washers in half and epoxy three half-washers around the mount.
Place your channel locks or vice-grips on either side of a washer and fold them back and forth, similar to how you snapped your panels at the start. The metal will become soft pretty quickly and break at the halfway point. If they’re a little bent at the break, place them on something hard (like a concrete floor) and hammer them flat again.
Scuff both the washers and the panel, epoxy, clamp, and let cure.
Tools & Materials Used
- ACM Panels
- 2-3 washers
- Epoxy
- Sandpaper
- Clamps
- Channel locks or vice grips (recommended)
Hinge Assembly
We will be installing the hinges using both bolts and epoxy, to give them the strongest bond possible. Before we get started, scuff hinges and panels with sandpaper to give them tooth for the epoxy to bond to.
Over several prototypes I have tried measuring the hole positions and calculating where I need to drill or placing the hinges on the panels and marking each hole with a pencil. Every time, I ended up having to redrill holes because something was off. Instead, we’re going to do the third and simplest way I’ve found.
Place each panel on a flat surface (that you can drill on) with a 3/4″ gap between them. For the purpose of the instructions I am assuming you have positioned your panels like in the blueprint, with the lower panel closer to you and the top panel farther away. The shelf side of the top panel should be facing up, the magnet side of the bottom panel should be facing down.
Position your two hinges so that they are widest on the upper panel and narrower on the lower panel, with the hinge knuckle facing up and centered as well as you can in the gap.
This is another “learn from my mistakes” moment. As we have the lightweight sketch easel positioned currently, the bolts will be installed facing up so that the nuts are on the inside and when the easel is closed you do not have bolt tips sticking out, waiting to snag on whatever passes by. There are only two per wing of each hinge because there is not enough room for four bolts. They are angled like they are so they won’t interfere with the nuts on the other hinge wing when closed. Trust me on this one, if you look carefully at my finished photos you’ll notice I have a few extra holes in my lower panel after an emergency re-arrange. No one wants an easel that only half-closes!
Use your pencil to mark the bottom outside holes of each hinge on the lower panel, following the positioning in the blueprint. Remove the hinges, center punch the two marks, and use a 1/8″ bit to drill your first two holes.
Once those are drilled, insert bolts (from the backside) into the holes and slide the hinges back on to them, loosely attaching each bolt’s nut. Reposition your hinges and panels so they look right and then tighten the nuts until the hinges are gently held in place. For your second set of bolts on the lower panel, you can skip marking it, just center-punch and drill straight through the holes. Mount bolts and nuts like you did with the first pair.
The hinges are now attached to the lower panel and it is time to move on to the upper panel. If you haven’t already, make certain the two panels are about 3/4″ apart and evenly spaced. To avoid having to redrill any holes, I would recommend starting with just one bolt, like the upper left. Refer to the blueprint for positioning, it should go in the top-outside hole. If you accidentally reverse it, not only will the easel not close properly, the bottom outside hole is so close to the corner cut on the panel you risk ripping it out.
Mark, center punch, drill, and bolt the first hole. Reposition your panels so they’re lined up correctly and repeat the process for the top right bolt on the other hinge. Once you have those two installed, the hinge assembly will be secure enough that you can quickly drill the remaining two spots and slide bolts into them.
Now that we have dry-fitted the hinges to make certain there will be no hiccups during the epoxy process, disassemble everything, mix epoxy, apply, and reassemble, making certain to get the nuts cranked nice and tight. If you have a little loctite to keep the nuts in place, use it. Personally, I used the remainder of my epoxy to coat the tips of the bolts, it’ll help keep them in place and soften their edges so they don’t accidentally snag anything.
You will want to wait for the last bit of epoxy to cure before using the easel, but if you want to give it a test open/close, by all means do so! You’ve earned it.
Tools & Materials Used
- ACM Panels
- Two friction hinges
- 8 bolts + nuts
- screwdriver
- wrench/ratchet
- Epoxy
- Sandpaper
- Drill
- 1/8″ Bit
- Hammer (recommended)
- Center punch (recommended)

So what do we have?

One Pound Painting Project Kit packaged for easy portability
Congratulations on making your own lightweight, ultra portable, sketch easel! The major component of my One Pound Painting Project, it is light enough and small enough to toss in any backpack or even a (large) purse. Use it as a tiny table easel while you watch TV, take it camping and capture that babbling brook, or throw it in your backpack to paint a vista from the top of a mountain!
I’d love to see what you’ve come up with! Use the hashtag #onepoundpaintingproject and message me on Twitter @TrevorLTaylor or tag me on Instagram @trevortaylor_art. You can also find me on Facebook here.
Other Kit Parts

Assembled One Pound Painting Project Kit