An amazing, ultra portable sketch easel needs an equally appropriate sketchbook. There is a long tradition of painting with gouache on toned paper, but unfortunately the smallest premade sketchbook I could find was still 6×8”. With a little DIY spirit though, we can change that and have the perfect 4×6” gouache sketchbook (3×6” paintable surface).
Recommended Tools
- Razor
- Paper punch (preferred) or hole punch
- Drill & small bit
- Pencil
- Ruler
Instructions
The concept is exceptionally simple when we come down to it. Take your 6×8” pad, measure and mark the halfway (4”) point on the outside cover, lay the ruler across it, and start cutting. As you cut, the bottom half of each sheet can be removed, leaving the glue-bound side attached at the top. Occasionally double check to make certain you’re not slowly “walking” the cut line in one direction or the other, but for the most part the previously cut edge can guide your razor for the next sheet.


Once you have cut through all the sheets of paper, measure the 4” halfway point on the chipboard backing (you want to be very accurate) and cut that in half. Once you have done that, you will have two piles, a loose-leaf pile and the top, glue-bound half. From here you have a choice, you can either use the glue-bound half as-is, or separate those sheets as well and convert them all.
I personally chose to convert the entire booklet to ring-bound. The standard three-ring punch in America has holes 4 1/4” inches apart, which means the center of each hole should be 7/8″ from their closest edge. Even though the 400 series paper is decently thick, the punch should make quick work of them.
You should have two 4×6” pieces of chipboard from cutting the backing in two (if you have just one because you’re keeping the glue bound side, just use the other half of the front cover). While the punch handled the paper with ease, it probably can’t handle chipboard. What it can do, is dent the chipboard enough to mark it, allowing you use those marks as a guide so you can drill holes through them.
Otherwise, you can make two marks, roughly 3/8″ from the top edge, and 7/8″ from either side, and drill those. Double check that these measurements correspond with your own paper punch though, each one is a little different.


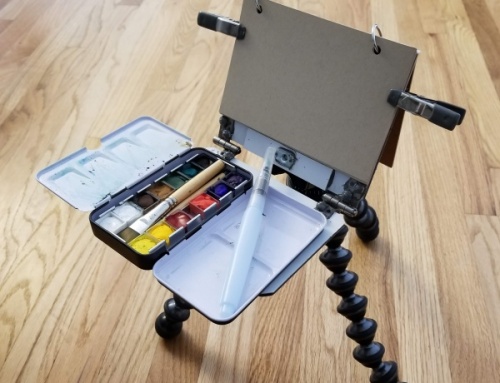
Finally, assemble the sketchbook! For the One Pound Painting Project, I only added 10 pages to my sketchbook and stored the rest. That is part of the magic of ring-bound sketchbooks, take just what you need and you can replace pages as you go. With 10 pages, it is only 88 grams, or just over 3 oz, and fits perfectly on the backpacking easel.