As the saying goes, if you ask three painters what their favorite palette style is, you will somehow end up with four answers. Over the years my preferences and tastes have evolved as I searched for the perfect palette setup.
Like many, I started with a cheap plastic thing and quickly upgraded to a small, inexpensive, and rectangular wooden palette. Once I started using a Mahl stick and needed my left hand free I adopted a glass palette that I placed on the table next to me while I sat and painted. While studying at an Atelier I learned the importance of painting while standing to facilitate being able to step back from your work so I started using hand-held palettes again and purchased the phenomenal New Wave Grand View palette. The New Wave palette was more comfortable to use with a Mahl stick but it still wasn’t perfect so I eventually fabricated a custom tripod mount so that I could work hands free and leave my palette next to the painting when I stepped back.
After some research I was sold on the idea of a vertical palette. They are more ergonomic, less taxing on your shoulder, and when toned in a neutral gray would aid in more accurate color mixing. A fellow local artist graciously made me a large tripod mounted wooden palette that I used for the past several years.
However, I became increasingly frustrated with how much floor space that palette system took up, thanks to the tripod, and was never really happy with where I had to place it as a result. Due to wide stance of the tripod legs, the palette generally was at a 90 degree angle from my painting. The lighting on the palette was great, but color matching was difficult as I couldn’t have both palette and painting in my field of view at the same time. I could have purchased a new base that was more compact and flexible, as I did quite like the palette itself, but I decided instead to take this opportunity to design my ultimate palette system.
From my previous experiences, I learned that my dream system should:
- be able to tilt fully vertical
- have a neutral gray mixing surface
- use glass, if possible, as mixing on glass, not to mention cleaning it, was more enjoyable
- have a small footprint without legs acting as tripping hazards or restricting positioning
- be viewable at the same time under the same lighting conditions as the painting
- be quick and easy to adjust
- be hands free once placed
With those goals in mind, I put together my “end goal” palette system, something that, to my surprise, I was able to do almost entirely with off the shelf parts.

Advantages of This System

As a painter who spends hours every day at the easel, I have learned that no single fixed palette setup is perfect for all situations. Sometimes I am standing, painting at the top of a large surface, sometimes I’m sitting, crouched over, painting by the bottom edge. A fixed system leaves my mixing surface off to one side, unable to adapt to the current circumstances without stopping and going through a lengthy readjustment process. If I switch positions or change what section I am working on, the palette is no longer where I need it to be. This problem is magnified as paintings get larger too.
If I use a hand-held palette, my left arm is no longer free to operate my mahl stick, I have to keep my arm constantly locked in a 90 degree position holding the palette, and I have to fight the glare from overhead lights, shifting around to get a clear view of the colors I am mixing. The semi-horizontal nature of a hand-held system also means that my mixing surface is getting more light than the vertical painting surface, which distorts value relationships.
My DIY ergonomic vertical palette eliminates all these problems.
The vertical surface means that the palette is getting the exact same light as the painting, so paints aren’t darker on the canvas than on the palette. Unlike with the warm brown of a traditional wooden palette, which can cause the colors to appear cooler due to relative color effect, the neutral gray background aids in accurate color mixing, letting me more readily see the true chroma, hue, and value. The removable glass palette is easier to clean, and I can store it in the fridge between sessions to save paint and start up again with minimal setup time.
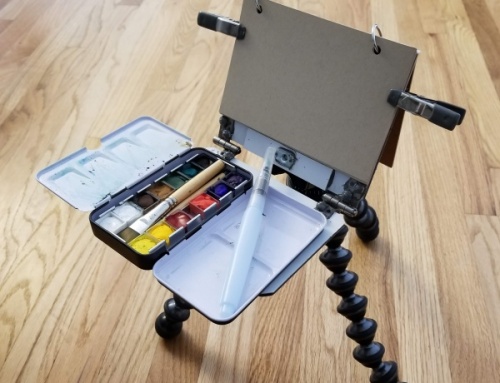
Both hands are free and everything adjusts quickly with minimal effort, keeping the palette at eye level at all times. The monitor arm is tuned to the weight of the palette so that it can be positioned using touch alone, tilting easily to horizontal to refresh the paint piles, and then back down to vertical for painting. Between the monitor arm and the overbed table, the palette can be set as low as three feet off the ground and as high as five feet, a comfortable shoulder-level for many. The footprint is solely the dimensions of the table, and with sandbags or water jugs used as ballast, the ergonomic arm can swing fully away from the table, positioning the palette immediately next to the area being worked on. Set up like this, everything is in the same field of view with minimal eye-travel time between surface and palette.
Ultimately the ergonomic vertical palette system allows the painter, painting, and palette to operate together more harmoniously than any other traditional setup.
Parts Used for Assembly
- Overbed Table – Any will do but this one has a solid weight rating (40 lb) and 5″ more travel distance than most (28-45″). You can clamp the monitor arm to a fixed table but this greatly increases the travel distance
- Gas Spring Ergonomic Monitor Arm – Most will work but I chose this one as it has a greater vertical tilt range than others, allowing the palette surface to tilt completely flat if needed.
- VESA Mount Laptop Stand – Again, most will work but this is the one I used. While it can only hold laptops up to 15.6″ wide, it will hold a 16″ palette as it is not as thick as a laptop.
- 16×12 glass cutting board or New Wave 16×12 glass palette – The glass cutting board is cheaper but you’ll want to put a small piece of neutral gray painted plywood behind it like I did. New Wave’s palette comes pre-toned in the right value and is ready to use out of the box.
- (optional) Masterson Artist Palette Seal – Not technically needed but you can pop your entire glass palette into this and stick it in your fridge or freezer at the end of the day, letting you pick up where you left off the next morning.
- (optional) Sand Bags – I had a pair left over from a different project but a gallon jug or two of water works just as well. Used as ballast to give the table more stability, especially if the palette has been positioned further away from the table’s center-of-gravity.
Assembly Notes
One of the joys of off-the-shelf parts is that there is no need for complicated instructions or measurements: the laptop stand bolts to the monitor mount, the monitor mount clamps to the table, the glass palette slides into the laptop stand. If something comes disassembled (like the bed-top table), assemble it according to the manufacturer’s included directions.
I would recommend clamping the monitor mount on the side of the table closest to the vertical leg, for extra stability.
It is not immediately obvious, but there are two mounting locations on the laptop stand, one flat and one at an angle. Use the angled one, which will only take two of the four bolts, as that will let you position the palette entirely horizontal for paint mixing.
In the pictures of my setup you can see that the monitor mount is clamped to a pair of boards. Those are just a pair of 2x4s that I screwed together to raise the maximum height three inches. They aren’t necessary for it to work, but if you are taller you might appreciate the extra height.
I had a spare piece of plywood that I placed on the bottom portion of the table, adding some extra storage and a convenient shelf to stack my sandbags.
More Pictures